
A storm rolls through New Jersey, the wind picks up, and suddenly you’re seeing water dripping from your ceiling. Roof emergencies don’t wait for convenient timing, and neither should your response. Whether you’re dealing with missing shingles, a major leak, or storm damage, knowing how to act fast can save your home thousands in water damage, mold growth, and structural deterioration. This guide walks you through emergency roof repair in NJ, what you can tackle yourself today and when to call in a pro. We’ll cover the most common roof emergencies homeowners face here, immediate damage control steps, safe temporary fixes, and how to find reliable contractors when the damage is beyond DIY territory.
Table of Contents
ToggleKey Takeaways
- Act immediately when roof damage occurs—move water to safe areas, document damage with photos, and contact your insurance company within 24–48 hours to protect your claim.
- Emergency roof repair in NJ requires knowing what you can safely tackle yourself, such as tarping damaged areas with heavy-duty plastic and clearing gutters, while leaving structural, flashing, and complex issues to licensed professionals.
- New Jersey homeowners face storm-specific roof emergencies including nor’easter damage, ice dams, hail-caused granule loss, and flashing failures that can silently lead to rot and water infiltration in walls and framing.
- Before hiring an emergency roofer, verify they hold a current New Jersey Home Improvement Contractor License, carry workers’ compensation and liability insurance, and provide detailed written estimates rather than demanding cash upfront.
- Temporary fixes like roof tarps are stop-gaps only—permanent repairs typically take 1–2 weeks, so contact multiple established contractors immediately during emergencies to avoid being forced into poor contractor choices.
Understanding Common Roof Emergencies in New Jersey
Storm Damage and Weather-Related Issues
New Jersey’s coastal and inland weather throws everything at roofs: nor’easters, heavy ice loads, sudden downbursts, and summer hail. When a storm hits, shingles tear, flashings lift, gutters clog, and entire roof sections can fail in minutes. High-wind damage often tears shingles starting from edges and ridge lines where wind creates lift. Ice dams, ridges of frozen water that form at roof edges in winter, can trap meltwater underneath and force leaks into attics even when no rain is falling. Hail, particularly the pea-sized pellets common in NJ spring storms, doesn’t always create obvious holes: instead, it bruises shingle granules, wearing through the protective layer and accelerating leaks months later.
Flashing failure is equally urgent. Flashing is the metal trim installed around chimneys, vent pipes, skylights, and valleys to direct water away from seams. When storms loosen flashing or corrosion eats through it, water finds its way straight into walls and framing. A loose or missing flashing is a silent threat that can cause rot you won’t see until it’s extensive.
Leaks, Sagging, and Structural Concerns
Not all roof emergencies are weather-related. Interior leaks might signal a problem that’s been developing for months. If you notice dark stains spreading across an attic rafter or ceiling, or soft, spongy wood around a roof penetration, you likely have active water infiltration and early-stage rot. Sagging roof decks, where you can visually see the roofline dips, suggest structural failure, possibly from rotted framing or excessive snow load. This is never a cosmetic fix and requires immediate professional assessment.
Moisture and mold growth in attics create health hazards and can compromise structural integrity. If your attic smells musty or you see visible mold on framing, you need a roofer and possibly a structural engineer. These issues won’t resolve on their own and worsen rapidly in NJ’s humid climate.
Immediate Steps to Take When Your Roof Fails
When you first notice roof damage, your priority is containment and documentation, not permanent repair.
First, move water away from the damage. If you have an active interior leak, place buckets under the drip and use towels to channel water away from walls and electrical outlets. Never let water pool in ceilings: the weight can cause collapse. Prop open attic access doors and run fans to promote air circulation and reduce moisture buildup.
Document everything photographically. Take close-ups of missing shingles, lifted flashing, and interior stains. Photograph the water trail from source to where it appears indoors. This documentation is essential for insurance claims and contractor estimates. Make a quick list of affected areas and any visible debris (shingle fragments, ice chunks, branches) near damage zones.
Call your insurance company within 24-48 hours of discovering damage, especially for storm-related issues. Most homeowners insurance covers sudden weather events but has strict timelines for reporting. Have your policy number ready and be specific about when damage was discovered and what caused it.
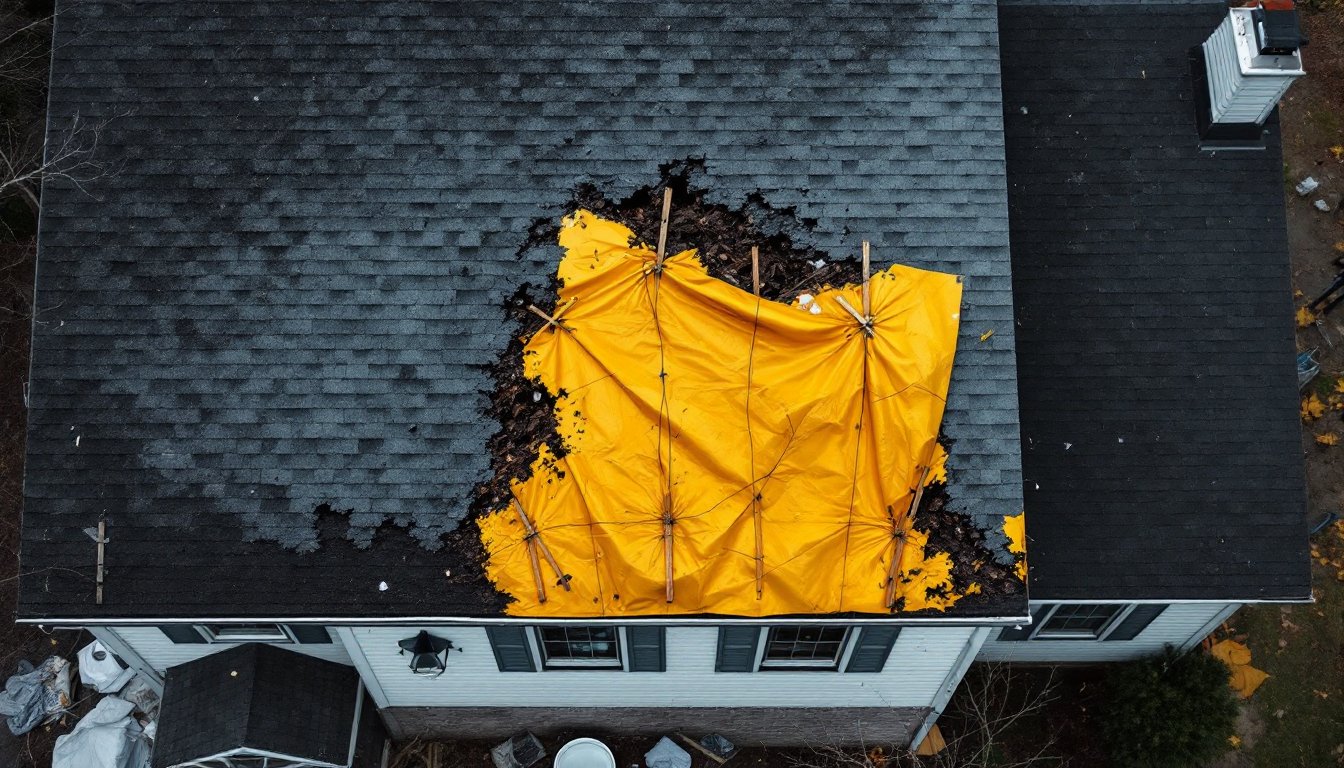
Don’t delay. An open roof draws more water in with every rain event. Tarping or temporary sealing buys you time to arrange proper repairs, but these are stop-gaps, not solutions.
DIY Temporary Repairs You Can Handle Today
What You Can Safely Tackle
Temporary roof repairs are about stopping water from getting inside, nothing more. Only attempt these if you can safely access your roof and feel comfortable at heights. Wear rubber-soled shoes, safety goggles, gloves, and a harness if possible. Never work on a wet roof or during active weather.
Tarping the damage: This is the most straightforward temporary fix. You need a heavy-duty plastic tarp (at least 6-mil thickness), 2×4 lumber, rope, and duct tape. Place the tarp so it extends at least 3 feet above and below the damaged area. Secure it with boards laid across the tarp and tied down with rope. The tarp should funnel water over the edge, not trap it. A poorly installed tarp can do more harm, so measure twice and secure firmly.
Replacing a few missing shingles: If you have 1–3 shingles blown off and intact nails remain, you might slide new shingles into place as a temporary fix. Lift the overlapping shingle above the damaged area carefully (use a shingle lifter or flat pry bar gently), remove nails, slide in a new shingle, and re-nail. Use 4 roofing nails per shingle, placed 5/8 inch from the top edge. This is temporary because matching shingle color and aging is difficult mid-roof, and you’ll need a full repair later.
Clear gutters and debris: Clogged gutters trap water against your roof. Remove leaves, branches, and ice dams blocking drainage. A wet-dry vacuum often works better than climbing a ladder over a gutful of wet debris.
What to Leave for Professionals
Don’t attempt to patch flashing yourself, repair structural sagging, or remove ice dams with a hammer (you’ll damage shingles further). Never go on the roof during rain, snow, or wind gusts. If your roof is steeply pitched (over 6:12), leave it to contractors with fall protection experience.
When to Call a Professional Contractor
Call immediately if:
- You see sagging or soft framing in the attic, this is a structural emergency.
- Water is actively dripping inside and you can’t locate the source.
- Damage covers more than a few shingles or involves flashing, valleys, or roof edges.
- You’re uncomfortable working at height or on a slope.
- Your roof is older than 15 years: material brittleness makes DIY repairs risky and often unreliable.
- You have active mold, ice dams, or signs of rot.
Insurance and permits: Storm damage repairs in NJ typically don’t require a permit, but structural repairs, roof replacements, and work affecting load-bearing elements do. A licensed contractor knows what triggers permit requirements. Many homeowners insurance policies require estimates from licensed contractors before approving claims, so get professional quotes regardless.
A professional roofer evaluates not just the visible damage but underlying conditions: deck integrity, ventilation, underlayment condition, and whether repairs will hold long-term. They also carry liability insurance and workers’ compensation, protecting you from liability if something goes wrong.
Expect a licensed NJ roofer to charge for estimates (typically $100–$300) and provide a detailed breakdown of materials, labor, and timeline. Cheap estimates often hide shortcuts: three comparable quotes help you understand fair pricing in your area.
Finding Reliable Emergency Roofers in New Jersey
When searching for a roofer during an emergency, desperation is a liability. Here’s how to hire well, quickly.
Check credentials first. Your contractor must hold a current New Jersey Home Improvement Contractor License. Verify it through the New Jersey Division of Consumer Affairs. Licenses show that the contractor has insurance, bonding, and has passed background checks. Ask for proof of workers’ compensation insurance and general liability coverage ($1 million minimum is standard).
Get multiple quotes. Even in an emergency, contact at least two established roofers. Platforms like HomeAdvisor and Angi let you compare contractor ratings, previous customer reviews, and scope estimates. Check whether reviews mention prompt response times during storms and quality of emergency tarping while permanent repairs are planned.
Ask specifics. How long will a temporary tarp hold? What’s the timeline for permanent repair? What happens if another storm hits before the repair is complete? Does the contractor carry manufacturer warranties on shingles and labor? Will they coordinate directly with your insurance company?
Red flags: Contractors demanding cash upfront, no written estimate, reluctance to provide references, or guaranteeing insurance approval should be avoided. Legitimate roofers outline costs clearly and explain what insurance may and may not cover.
Act on timeline. Permanent repairs in New Jersey typically take 1–2 weeks if materials are in stock and weather cooperates. Emergency situations may take longer, so book quickly if you want a specific contractor rather than whoever has immediate availability.